High-quality fish feed is the backbone of successful aquaculture. fish feed extruder Properly processed feed ensures optimal growth, efficient feed conversion, and minimal environmental waste. This guide covers the entire process—from selecting ingredients to storing the finished product—for both small-scale and industrial production.
1. Ingredient Selection & Formulation
Before processing, you must formulate a nutritionally balanced diet. The formulation depends on the fish species (carnivore, omnivore, or herbivore) and life stage (fry, grower, or broodstock).
Tip: For carnivorous fish (e.g., salmon, trout), use at least 35–50% protein. For herbivores (e.g., tilapia, carp), 25–35% protein is sufficient.
2. Raw Material Preparation
Grinding / Milling
Goal: Reduce particle size for better mixing, cooking, and digestibility.
Equipment: Hammer mill or disc mill.
Recommended particle size: <250 μm for fry; <500 μm for adults.
Tip: Over-grinding increases energy cost; under-grinding leads to poor pellet quality.
Sieving (optional)
Remove oversized particles or foreign matter (stones, metal) using a magnetic separator and vibrating sieve.
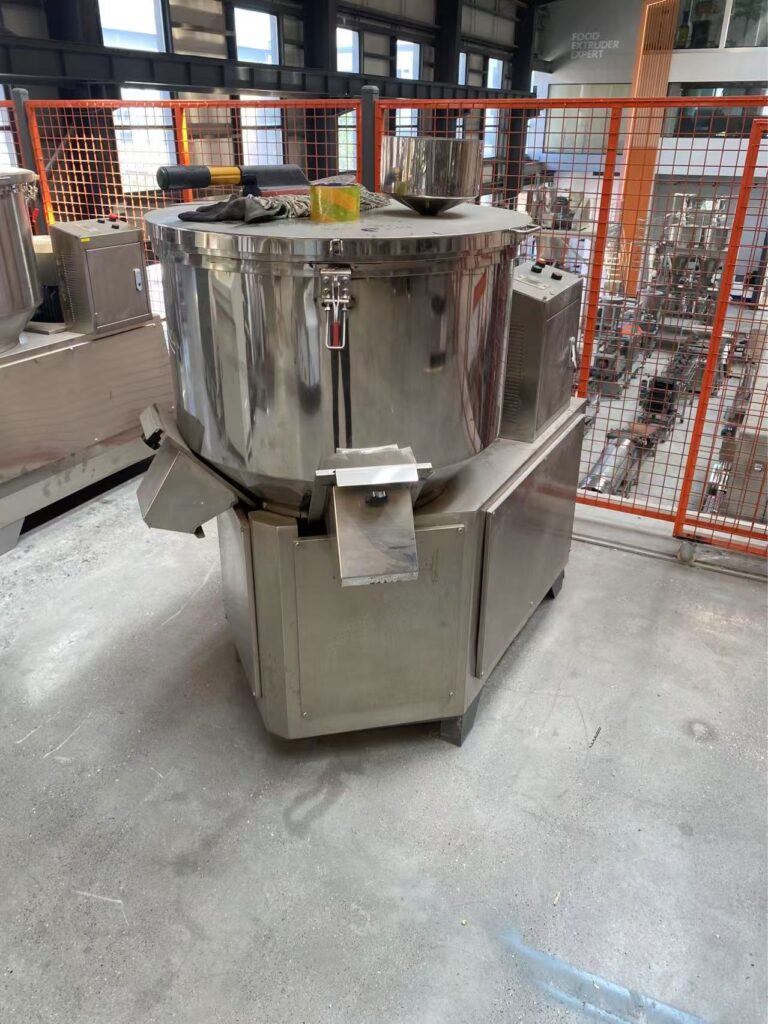
3. Mixing
All dry ingredients (protein sources, flour, minerals, vitamins) are blended into a homogeneous mixture.
Equipment: Ribbon blender, paddle mixer, or vertical screw mixer.
Mixing time: 10–15 minutes.
Sequence: Add major components first (meal, flour), then micro-ingredients (vitamins, minerals) last to avoid loss.
Tip: Add 2–5% water or oil during mixing to reduce dust and improve binding.
4. Conditioning & Cooking
Conditioning hydrates and heats the mash to gelatinize starches (improves binding and digestibility) and destroy anti-nutritional factors (e.g., trypsin inhibitors in soy).
Equipment: Steam conditioner (batch or continuous).
Temperature: 80–95°C (176–203°F).
Time: 30 seconds to 5 minutes.
Moisture content after conditioning: 25–35%.
Critical point: For heat-sensitive vitamins (e.g., vitamin C), use post-extrusion coating.
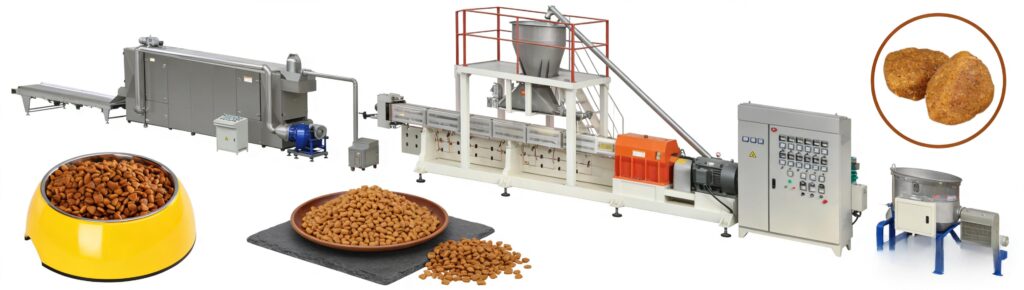
5. Extrusion (The Heart of Modern Fish Feed)
Extrusion is the most common method for floating fish feed. It cooks, shapes, and expands the material.
Extrusion Process
Feeding: Conditioned mash enters the extruder barrel.
Expansion: As the dough exits through a die, the sudden pressure drop causes water to flash into steam, creating pores → floating pellets.
Cutting: A rotating knife cuts the extrudate into desired pellet length (2–12 mm).
Types of Extruders
Single-screw extruder: Lower cost, good for simple formulations.
Twin-screw extruder: Better mixing, handles high-fat or high-fiber recipes.
Alternative: Pellet Mill (for sinking feed)
If producing sinking feed (e.g., for shrimp, catfish, bottom feeders), use a pellet mill (dry extrusion). No expansion occurs; pellets are dense and sink.
6. Drying
Freshly extruded pellets contain 22–28% moisture and must be dried to ≤10% for safe storage.
Equipment: Belt dryer, fluidized bed dryer, or rotary drum dryer.
Temperature: 60–100°C (140–212°F).
Time: 10–30 minutes.
Target moisture: 8–10%.
Warning: Over-drying makes pellets brittle; fish feed extruder under-drying leads to mold growth.
7. Coating (Fats & Oils)
After drying, fats and oil-soluble vitamins (A, D, E, K) are applied externally to prevent oxidation during processing.
Equipment: Vacuum coater or drum coater.
Oil addition: Up to 20–30% for high-energy diets (e.g., salmon).
Processus : Pellets enter a rotating drum; oil is sprayed as they tumble. Vacuum coating forces oil deep into pores.
Tip: Use antioxidants (e.g., ethoxyquin, vitamin E) to prevent rancidity.
8. Cooling
Coated pellets are still warm (40–60°C). They must be cooled to ambient temperature to prevent moisture migration and caking in bags.
Equipment: Counterflow cooler or fluidized bed cooler.
Airflow: Ambient air drawn upward through the pellet bed.
Final temperature: ≤ 5°C above room temperature.
9. Sieving & Grading
Remove fines (dust) and broken pellets using a vibrating sieve with stacked screens.
Fines: Recycled back into the extruder (≤10% of batch).
Oversized pellets: Re-ground or sold as “chunks” for larger fish.
10. Quality Control (QC) Checks
Perform these tests on every batch:
Test
Method
Target
Pellet durability index (PDI)
Rotate pellets in a tumbler; % intact after 10 min
≥95% for floating feed
Water stability
Soak in water for 1–24 hours; check disintegration
≥80% intact after 2 hours
Floating time
Drop pellets into water
>6 hours for floating feed
Moisture content
Moisture analyzer or oven drying (105°C, 4h)
8–10%
Oil leakage
Press pellet between paper; check for staining
None
11. Packaging & Storage
Proper packaging and storage prevent spoilage, oxidation, and pest infestation.
Bags: Multi-layer paper + polyethylene liner (to block moisture and oxygen).
Bag size: 15–25 kg for manual handling; 500–1000 kg for bulk bags.
Steam or boil the dough for 15–20 minutes (to gelatinize starch).
Press through a meat grinder or manual pelletizer.
Dry in the sun (cover with net to keep insects away) or in an oven at 60°C.
Store in airtight containers.
Limitation: Pellets will sink, water stability is lower (30–60 minutes), and shelf life is short (1–2 months).
Conclusion
Producing high-quality fish feed requires careful attention to each step—from grinding and mixing to extrusion, drying, and storage. fish feed extruder Whether you are running a backyard operation or a commercial mill, following these guidelines will improve feed conversion, reduce waste, and keep your fish healthy.
Final checklist for success:
✅ Balanced formulation for your species
✅ Fine grinding (<500 μm)
✅ Proper steam conditioning (80–95°C)
✅ Correct extrusion parameters
✅ Drying to 8–10% moisture
✅ Vacuum oil coating (if high-fat diet)
✅ PDI >95% and water stability >2 hours
✅ Cool, dry, dark storage
By mastering these steps, you’ll produce feed that rivals commercial brands—at a fraction of the cost.