
Temperature control is arguably the most critical operational parameter in twin-screw extrusion. It directly influences melt viscosity, reaction kinetics (in reactive extrusion), product quality, and even equipment longevity. Poor temperature control can lead to material degradation, inconsistent output, excessive torque consumption, and accelerated screw and barrel wear .
This guide provides a systematic approach to understanding and controlling temperature in a co-rotating, intermeshing twin-screw extruder (TSE), covering barrel zone profiling, screw design considerations, and advanced control strategies.
Part 1: Understanding the Fundamentals

The Two Sources of Energy
In a TSE, the energy that melts and heats the polymer comes from two distinct sources :
- External (Barrel) Heating: Electric heaters wrapped around the barrel sections transfer heat into the material via conduction.
- Mechanical (Viscous) Heating: As the screws rotate, they shear, knead, and compress the polymer. The friction and internal resistance generate significant heat. This is often the dominant heat source once the extruder is running.
Key Insight: Many operators over-rely on mechanical energy (“brute force”) and underutilize barrel heating. This leads to higher torque usage, increased screw wear, and less stable melt temperatures .
The Pressure-Temperature Relationship
An often-overlooked factor is the temperature rise caused by pressure generation at the die. A restrictive die or screen pack increases back-pressure, which directly increases melt temperature. A useful approximation is :
ΔT (°C) ≈ ΔP (bar) / 2
For example, if your die pressure is 40 bar (580 PSI), the associated melt temperature rise can be approximately 20°C .
Part 2: Barrel Zone Temperature Profiling
Modern TSEs feature segmented barrels, each with independent heating/cooling zones (typically electric heaters and liquid cooling) . The number of zones depends on the Length-to-Diameter (L/D) ratio. For example, a 40:1 L/D extruder may have 5-6 heating zones .
Zone-by-Zone Strategy
Zone 1 (Feed Zone) – Cool
- Purpose: Prevent bridging and premature melting.
- Setting: Water-cooled (no heating). This ensures the feed port remains cool so pellets do not soften and stick, which would block the throat .
Zones 2 & 3 (Melting/Plasticating Zone) – Hot
- Purpose: Initiate melting efficiently and reduce mechanical load on kneading blocks.
- Strategy: Set these zones surprisingly high (e.g., 200-250°C depending on polymer).
- The Paradox: Because the material passes through this zone in seconds, the actual melt temperature will be much lower than the barrel set point (e.g., set at 250°C results in a melt of 180°C) . High settings here allow heat to penetrate the pellets quickly, easing the workload on the screws and reducing wear .
Zones 4-6 (Mixing/Reaction Zone) – Moderate
- Purpose: Maintain melt viscosity for proper mixing or reactive extrusion (e.g., TPV vulcanization).
- Strategy: These zones often run at the target melt temperature. For thermally sensitive materials, you may need a “reverse temperature profile” (cooler towards the die) to prevent degradation .
Die & Adapter Zones – Insulated & Stable
- Purpose: Maintain uniform flow without cold spots or thermal degradation.
- Strategy: These should be wrapped with thermal insulation .
- Benefit of insulation:
- Reduces temperature cycling (sine wave trend becomes a flat line) .
- Eliminates cold spots from uneven heater coverage.
- Speeds up heat-up times.
- Prevents operator burn injuries .
Example Temperature Profile
The table below illustrates a typical temperature profile for a polymer with a melting point of ~150°C :
| Zone | Function | Set Point (°C) | Reasoning |
|---|---|---|---|
| Zone 1 | Feed | Water Cooled (~30-50) | Prevent bridging in hopper |
| Zone 2 | Melt initiation | 180 – 220 | High heat to soften pellets quickly |
| Zone 3 | Plasticating | 170 – 200 | Continue melting, reduce torque |
| Zone 4 | Mixing | 160 – 180 | Maintain viscosity for shear mixing |
| Zone 5 | Devolatilization | 155 – 165 | Slightly cooler to prevent outgassing issues |
| Zone 6 | Metering/Pumping | 150 – 160 | Stable pumping |
| Die | Shaping | 150 – 160 | Uniform exit; insulated to prevent loss |
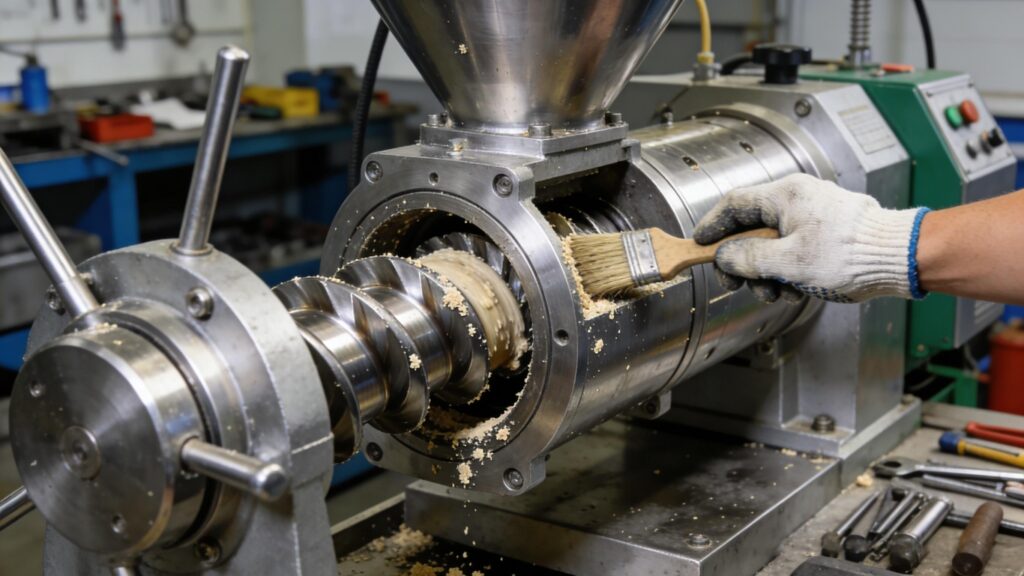
Part 3: The Role of Screw Design in Temperature Control
The screw configuration is the “hidden” variable in temperature control. You can set the barrels to any temperature, but if the screw design is too “aggressive,” the melt temperature will spike regardless .
Aggressive vs. Extended Melting Zones
- Aggressive Design: Uses narrow, steeply staggered kneading blocks. This imparts high shear energy, raising the melt temperature significantly. While good for dispersion, it risks degradation and limits maximum throughput .
- Extended Design: Uses wider kneading blocks and longer conveying sections. This distributes energy more gently. Data shows that extended designs produce lower melt temperatures and allow for higher throughput rates (kg/hr) before hitting torque limits .
Finding: In one study, an aggressive design ran at 320°C melt temp, while the extended design ran at 270°C at the same speed (1000 RPM) . The aggressive design also showed visible smoke and discoloration due to degradation .
Using Kneading Blocks
Kneading blocks are the primary mixing elements, but they are also the primary heat generators. To manage temperature :
- Use wide kneading discs (e.g., 45° or 60° staggering) for gentle kneading.
- Use narrow discs (e.g., 30° or 90°) for intense shear (and higher heat).
- Limit the number of consecutive kneading blocks if processing heat-sensitive materials.
Part 4: Dynamic Control Variables (Screw Speed & Feed Rate)
Melt temperature is not controlled by barrel heaters alone once steady state is reached. The primary dynamic controls are Screw Speed (RPM) and Feed Rate (kg/hr) .
1. Screw Speed (RPM)
- Effect: Higher RPM increases the shear rate, increasing viscous heat generation .
- Rule of Thumb: Melt temperature often scales linearly with RPM at constant feed rates .
- Control Strategy: If your melt temperature is too high, reduce RPM (and adjust feed rate to maintain fill level).
2. Feed Rate (Throughput)
- Effect: Higher feed rates generally result in lower melt temperatures if the screw is designed correctly. Why? More material acts as a heat sink and reduces the specific mechanical energy (SME) per kg .
- Control Strategy: Running at low rates with high RPM is a recipe for thermal degradation (high energy imparted into a small amount of stationary material) .
Multivariable Control (MPC)
In modern facilities, Model Predictive Control (MPC) is used to handle the interaction between these variables. For example, to regulate Melt Temperature (MT) and Motor Load (ML), the system manipulates Screw Speed (SS) and Barrel Wall Temperature (WT) simultaneously . This is essential for reactive extrusion (like TPV production) where temperature directly controls the chemical crosslinking reaction .
Part 5: Practical Troubleshooting & Tips
Tip #1: Install Thermal Insulator Gaskets
Heat travels from the hot Barrel #2 to the cold Feed Barrel via conduction through the bolted flanges. Install a 1-2mm thermal insulator gasket between these barrels. Without it, Barrel #2 may never reach its set point (e.g., stuck at 135°C when set to 180°C) .
Tip #2: Insulate the Melt Pipe
As noted earlier, a bare melt pipe loses massive heat via convection/radiation. Adding insulation (ceramic fiber blankets) is a low-cost, high-impact fix that stabilizes temperature and saves energy .
Tip #3: Monitor Melt Temperature Correctly
Be aware that the type of thermocouple used affects readings. An immersion probe (sticking into the melt) reads higher, truer temperatures. A flush probe (mounted flush with the barrel wall) is influenced by the metal barrel temperature and may read significantly lower (50°C difference is possible) .
Tip #4: Achieving Equilibrium
Do not trust temperature readings immediately after start-up. It takes time for the massive screw and barrel assembly to reach thermal equilibrium. For accurate process control, wait at least 10-15 minutes after set points are reached before assuming the melt temperature is stable .
Summary: Temperature Control Checklist
| Control Lever | Action for Lower Melt Temp | Action for Higher Melt Temp |
|---|---|---|
| Screw Speed (RPM) | Decrease RPM | Increase RPM |
| Feed Rate (kg/hr) | Increase rate (to absorb energy) | Decrease rate |
| Screw Design | Use “Extended” melting zone (less aggressive kneaders) | Use “Aggressive” kneading blocks |
| Barrel Zone 2/3 | Decrease set point (less external heat) | Increase set point |
| Die Pressure | Open die gap / remove screens | Restrict die / add screens |
| Cooling | Ensure barrel cooling circuits are functional | Turn off cooling |
By integrating proper barrel profiling, thoughtful screw design, and dynamic control of RPM and feed rate, you can master melt temperature control, resulting in higher quality product, lower scrap rates, and extended equipment life.